
[toc]
Key features
- Advanced and customizable conditional logic
- No restrictions on targeting emails for your customers
- Use many different variables
- Use coupon option to set coupon details in email
Installation
Step 1: Click on Plugins and then click on Add New

Step 2: Search for “SIP Advanced Email Rules for WooCommerce” in the Search for plugins box. Check it for developer Shopitpress.
Step 3: Click install now to install the SIP Advanced Email Rules for WooCommerce Plugin. After the installation is completed. Click on the activate plugin to activate it. This completes the installation.
Usage
With SIP Advanced Email Rules you can create follow-up emails for your customers based on any criteria you want. You can finally have the flexibility of sending targeted emails to your customers based on advanced criteria, never send manual emails again!
Create Email Notification
Creating an email is easy. Go to SIP Plugins -> Advance Email Notification from the WordPress menu, then click on “Add new”.
Advanced Email Conditions
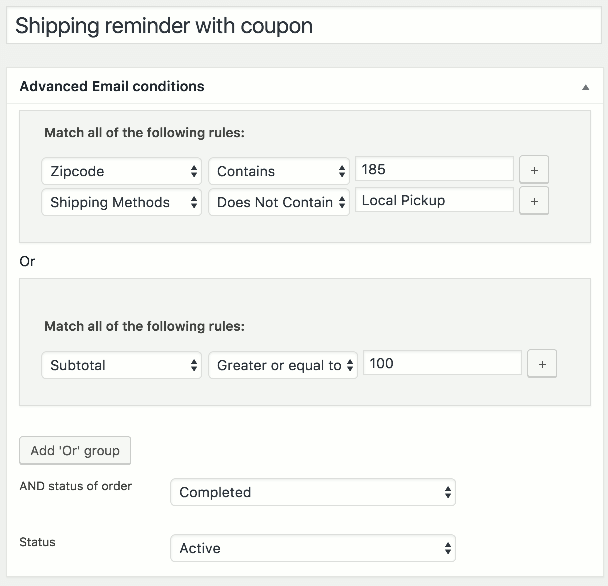
Wth SIP Advanced Email Rules for WooCommerce, there are no restrictions on targeting emails for your customers. Use any information of the customer together with conditionals to create powerful email rules.
Please note that you can create “Or” groups, however all the rules within each “Or” group must match to trigger the email.
- AND status of order: The email will be created when the order changes to the status you select here. Note: in addition to default WooCommerce order status, there is a “Process SIP email rules” status, if you create a rule with order status, the email will be triggered on all orders you select to process manually (see the section “Triggering email rules manually).
- Status: This is the status of the email conditions, choose “Active” to create emails when the rules are matched or “Inactive” to stop creating emails for those rules.
How to use custom fields during setting rules from Advanced Email Conditions section?
There are lots of variable names which you can use in the custom field for setting rules in Advanced Email Conditions. These are the list of variable name: _order_key, _created_via, _order_shipping, _cart_discount, _cart_discount_tax, _billing_address_1, _billing_address_2, _billing_city, _billing_state, _billing_postcode, _billing_country, _billing_phone, _billing_email, _billing_company, _billing_last_name, _billing_first_name, _cart_hash, _order_version, _payment_method_title, _payment_method, _shipping_postcode, _shipping_state, _shipping_city, _shipping_address_2, _shipping_last_name, _shipping_company, _shipping_country, _shipping_address_1, _shipping_first_name, _customer_user, _order_currency, _prices_include_tax, _customer_ip_address, _customer_user_agent, _order_total, _order_shipping_tax, _order_tax
Flexible email content
You can set email format here. You can also set the time to send an email.
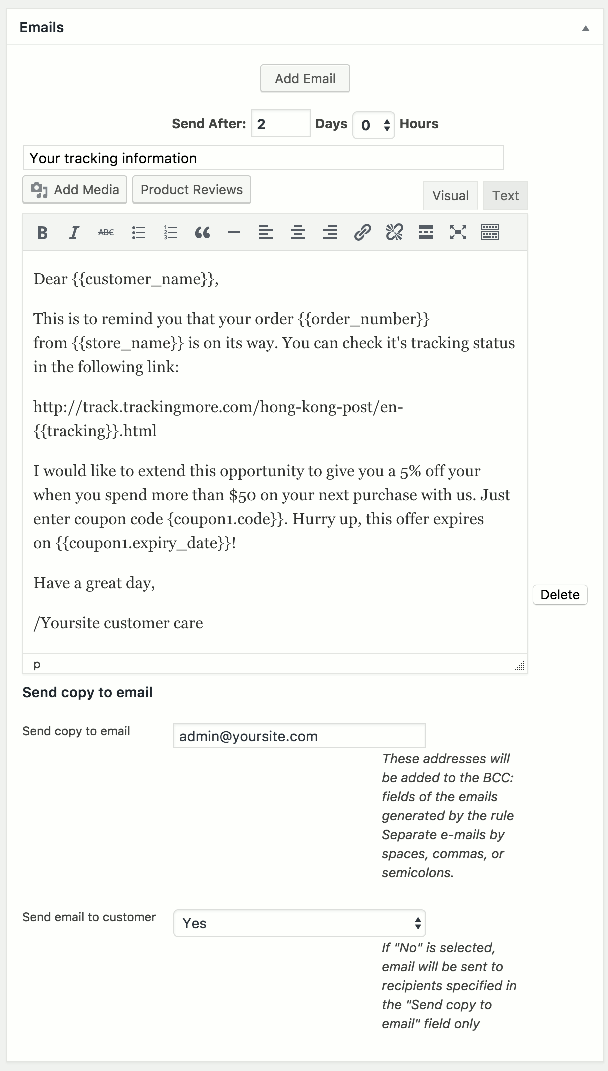
You are allowed to use shortcode or any variable to display any content in email. There is some shortcode display below to understand its purpose to use.
| Shortcode | Purpose |
|---|---|
| {{customer_first_name}} | The first name of customer |
| {{customer_last_name}} | The last name of customer |
| {{store_url}} | The url of shop page of woocommerce |
| {{store_name}} | The name of blog |
| {{order_number}} | The order number |
| {{order_url}} | The url of order view |
| {{order_items}} | List of order item with link and name. |
| {{order_items_with_thumbnail}} | List of order item with name and thumbnail |
| {{tracking}} | Tracking of the order (requires aftership plugin) |
| {{coupon1.code}}, {{coupon2.code}} | send multiple coupon |
| {{coupon1.expiry_date}}, {{coupon2.expiry_date}} | expiry date of coupon |
Coupon option
- Enable coupon for this follow-up email rule: Enable or disable coupon for this follow-up email rule.
- Coupon Name: You can set coupon name here. For example, If you will set coupon name “gift” then users will be received coupon name like “gift-wx12yz”, “gift-sd86rf”. That means it’s followed by this pattern: “coupon_name-[A2][N2][A2]” where A2 mean two alphabets and N2 mean two digits.
- Coupon expiry date: set coupon expiry date.
- Coupon type: Set coupon type here in Amount or Percentage.
- Apply before tax: If checked, the coupon should apply before calculating tax.
- Individual use: If checked, the coupon can not be used in with another coupon.
- Enable free shipping: If checked, the coupon can enable free-shipping.
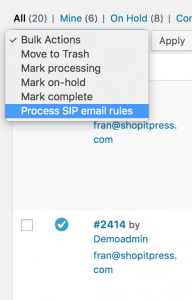
Triggering email rules manually
We have now added the ability to process email rules on orders you select manually. From the orders page, select “Process SIP email rules”. This will run the email rules on the selected orders and create new emails if the conditions match. Please note that if an email from a specific rule for a customer has already been sent, it won’t create a duplicate.
Uninstalling
Uninstalling the plugin is straightforward like any other WordPress plugin.
Step1: Click on Plugins >> Installed Plugins to see the list of installed plugins. Now click on the Deactivate plugin to deactivate it first.
Note: Remove all the shortcodes in all the pages / posts that are generated by this plugin, as after the plugin is removed. The code will be displayed on a front end, which will not look good on the front end of the website, where your visitors view pages.
Step2: After deactivating the plugin,you can see the option to delete the plugin, click on delete link to remove the plugin from your WordPress. Now the plugin is removed.