
Do you want your customers to remain with you for long; you want them to visit your site repeatedly, right? Therefore, to achieve this goal, a strategically designed “WooCommerce Thank You Page” will 100% work as a powerful marketing tool.
Why we’re saying this so confidently? How will it benefit your business? What is the right method to create a custom ‘WooCommerce Thank You Page’ that keeps customers engaged with you?
All valuable insights will be uncovered in this article.
So without any delay, let’s put light on some necessary details and then begin with tutorial steps that help you in creating a successful and responsive WooCommerce Thank You Page.
WooCommerce Thank You Page: An introduction
Typical thank you pages are limited to only minor details with no attractions and no valuable information. However, it’s the most valuable page through which customers quickly look at their entire purchases.
In short, it’s the last page that buyer reaches after successfully purchasing online, and on this page, as a seller, you need to share with them all the necessary information.
Therefore, in this way, you’ll win the buyer’s trust in you. It also increases the possibility that customers may think about purchasing further items from you and visit your website again. So, you will get regular customers by having a customized thank you page for your buyers.
Major perks for building a WooCommerce Thank You Page
Experts always focus on the “Thank You Page” because they know that here they can put their most powerful promotional strategies. We all know the fact that getting new customers is easy, but retaining your existing customers is a challenging part. Hence, having a beautiful and customized Thank You Page will help you stand out from your competitors and you will be able to retain your customers by offering them personalized offers in the thank you page.
After purchasing a product/service, it’s the only-stop where customers spend most of their time, and as a seller, you should grab this opportunity with both hands. Few techniques and some default settings, and you’re all set with a powerful marketing thank you page that will boost your sales right after the implementations.
Want to know how to do it? Let’s get started.
How should a customized WooCommerce Thank You Page be?
Important note to start with: Don’t overstuff your “Thank You Page” with promotional elements all at one time or one spot. Buyers first prefer to review their purchased sections. Only after that you can implement the following techniques that meet your business requirements. So try accordingly.
Note: We’re using WooCommerce Thank You Page plugin. It is available from $49 per year and comes with a 14-day money back guarantee.
So, let’s glance at the following influential methods that can transform your WooCommerce Thank You Page into a professional page. Once implemented on your e-commerce store, you’ll be capturing great profitable results from day 1.
Display Discounts or Coupons
Discounts and Coupons are something that a customer can’t skip without exploring. It’ll encourage them to go one step ahead and end up purchasing a second item, irrespective of whether they need it or not, but they’ll purchase it.
It’s one of the great sales techniques that you might have seen leading-companies often executing on their sites. Especially in the off-seasons, you will find that coupons and discounts remain on a hike.
Hence, you must consider this method on your Thank You Page. You can introduce them with some call-to-action lines in addition to just a simple discount or coupon pop-ups.
For example, you can mention discounts or coupons on WooCommerce thank you page with limited offers, now or never messages, etc. This will make the customer come across the decision of buying again without thinking twice.
Message to the Buyer “Share on Social Media”
Most of the time, people purchase items with excitement; they want to share their experience and provide an update to friends on some exclusive offers. Hence, it’s one of the most recommended features that you must include in your WooCommerce thank you page.
Moreover, in this way, you’ll be generating free traffic to your website. For instance,- You no longer need to spend a huge amount on Google ads, Facebook ads, Twitter, or Instagram for promotions.
Without spending a huge money on ads, you can create a free promotional hub where your product’s information will be reaching directly to your targeted audience. The chain of your potential buyer will extend more. Word of mouth works as the best marketing tool even today, so use this strategy to get more customers.
Even smart WooCommerce sellers and the world’s leading online shopping site Amazon follow this feature on their Thank You page. This is because their are millions of active social media users.
Cross-selling
Cross-selling is another great WooCommerce method widely used on a Thank You Page. By using this method, you provide customers with bundled products related to the original product the user was trying to purchase.
On WooCommerce Thank You page, you can show the combo of the products at some discounted price. This increases the chances that the customer finds it a great deal, and no doubt, he may think about buying it.
Isn’t it a great method to increase sales in a business? But make sure that the items you’re choosing for cross-selling are relevant to the customer because a customer will only think about purchasing them in bulk if they are providing value to them.
You will sell more items using cross selling and at the same time your customer will be happy that he got a bundled deal at a discounted price.
Display the product guide or information
If you provide more value to your customers, there are high chances that they will become your regular customers.
To do this, you can attach your detailed instructions with screenshots, relevant images, or video content in WooCommerce Thank You Page Plugin.
A buyer always expects this most important thing from their sellers. In the future, if they ever think about purchasing a particular item with the right guidance, they’ll 100% approach you. Hence, you must follow this method.
Downloads
If there’s much more to provide in the product’s context, add a download option on the thank you page.
In this way, the buyer can download the information related to the product, and they can review it anytime anywhere. So don’t forget the downloading links!
Shipping Information
The customer’s most satisfying moment is watching their product shipping from the seller’s store to their doorstep.
The visual experience is a far better thing that you can provide to your customer. This way, they can easily track the product they have purchased.
It may sound unnecessary to you, but remember, in this way, you’ll be providing more value to the customers. Not every customer likes going to the “My Orders” section again to check the shipping status. Therefore, they will find it convenient to check it out directly on the thank you page.
Ask Questions
In the end, you can also ask a few questions related to your products/services to the customers. But don’t ask too many questions as this will not work out. Adding a short survey in yes or no format of around one to four questions is an ideal choice.
The reason behind doing this is that you can get an idea of the customer’s experience while shopping with you. Negative response gives you the valuable insights on how you can improve your online store in the future. While the positive response will encourage you that everything is going as per your plans, don’t be disheartened if you receive a few negative feedback. This will only help you to improve the customer experience.
Customizing WooCommerce Thank You Page
Now, you might have got an idea of what a professional WooCommerce Thank You Page should look like. Now, it’s time to walk through the steps that’ll help you create a perfect Thank You page.
Creating WooCommerce Thank you page
Install and activate the WooCommerce Thank You Page plugin. Now replace the default Thank You Page and create a new one.
Follow the steps for clearing your own Custom WooCommerce Thank You Page:-
- Go to the WooCommerce option and then Thank You Page.
- Now right-click on the ‘Add Thank You Page’ option.
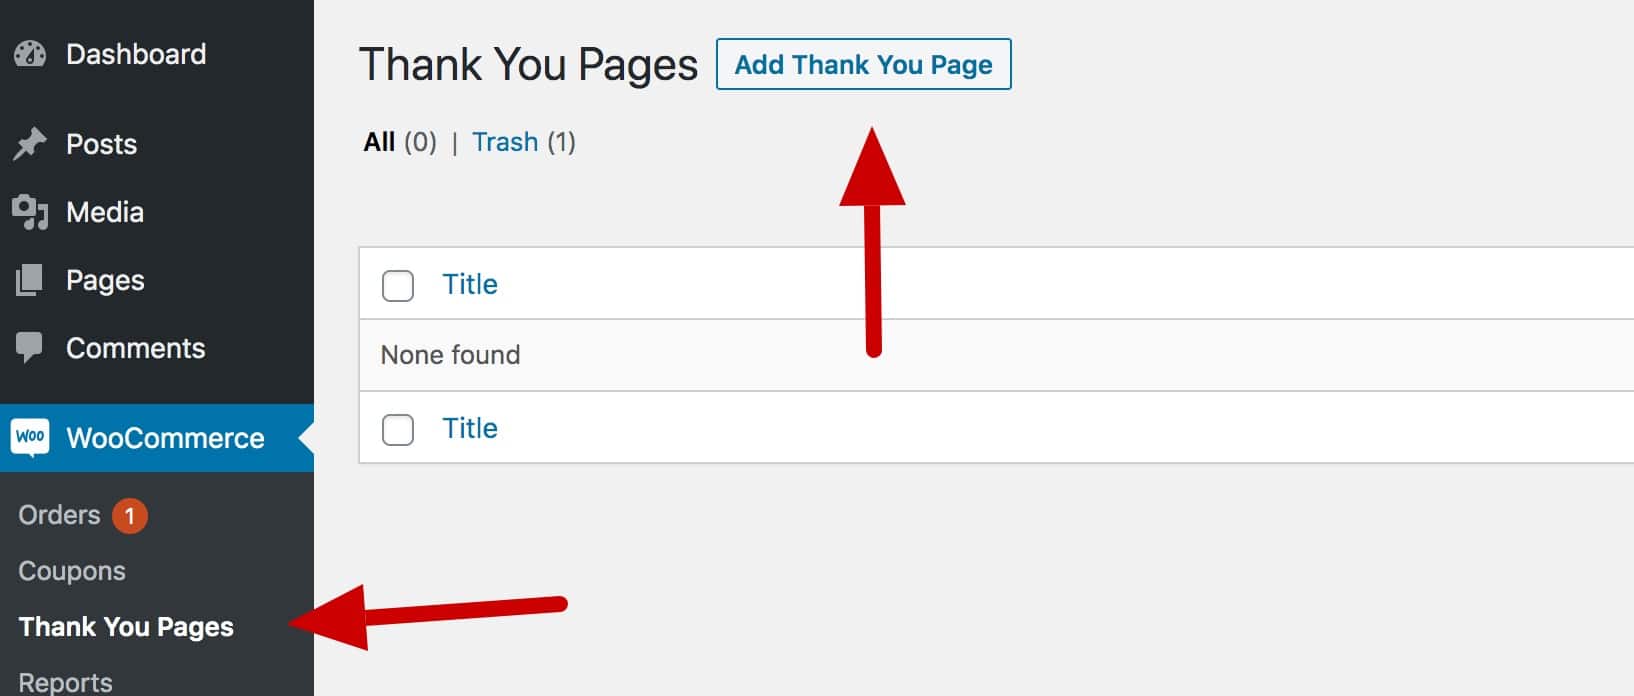
- After that, choose the options from above that you want to add in your Thank You Page.
To make the process a bit simpler, we’ve described a step by step process on each component to add in your ‘WooCommerce Thank You Page.’ Have a look at the steps below.
Adding Coupons to the Thank You Page
After successfully installing and activating the plugin, you will get access to the ‘Add Thank You Page.’
- Now it’s time to give it a title.
- Then add the Shortcode [order_coupon ] in the content area
If you find it a bit hard, follow the below steps.
- Go to the settings option in WooCommerce.
- In Thank You page, you’ll find the coupon section.

However, if you want, then you can also mention some Terms and Conditions for availing the discount.
Addition of Custom Content to the Thank You Page
Through this step, you can add more information, or even ask questions in the context of a product that your customers can check and follow. What you need to do is-
- Again Edit in your Custom Thank You Page.
- Choose a title.
- Now add the Shortcode [order_custom_content] in the area of content.
- Add content that you want to attach with the Thank You page- Choose from your WordPress site.
- Use the Shortcode [order_custom_content] to close the content area.
Adding Recommended Products to the Thank You Page
To apply the cross-selling technique, you can follow these steps- just edit in that same custom Thank You Page.
- Choose a Title.
- Add the Shortcode [order_cross_sells] in the area of content.
For further steps,
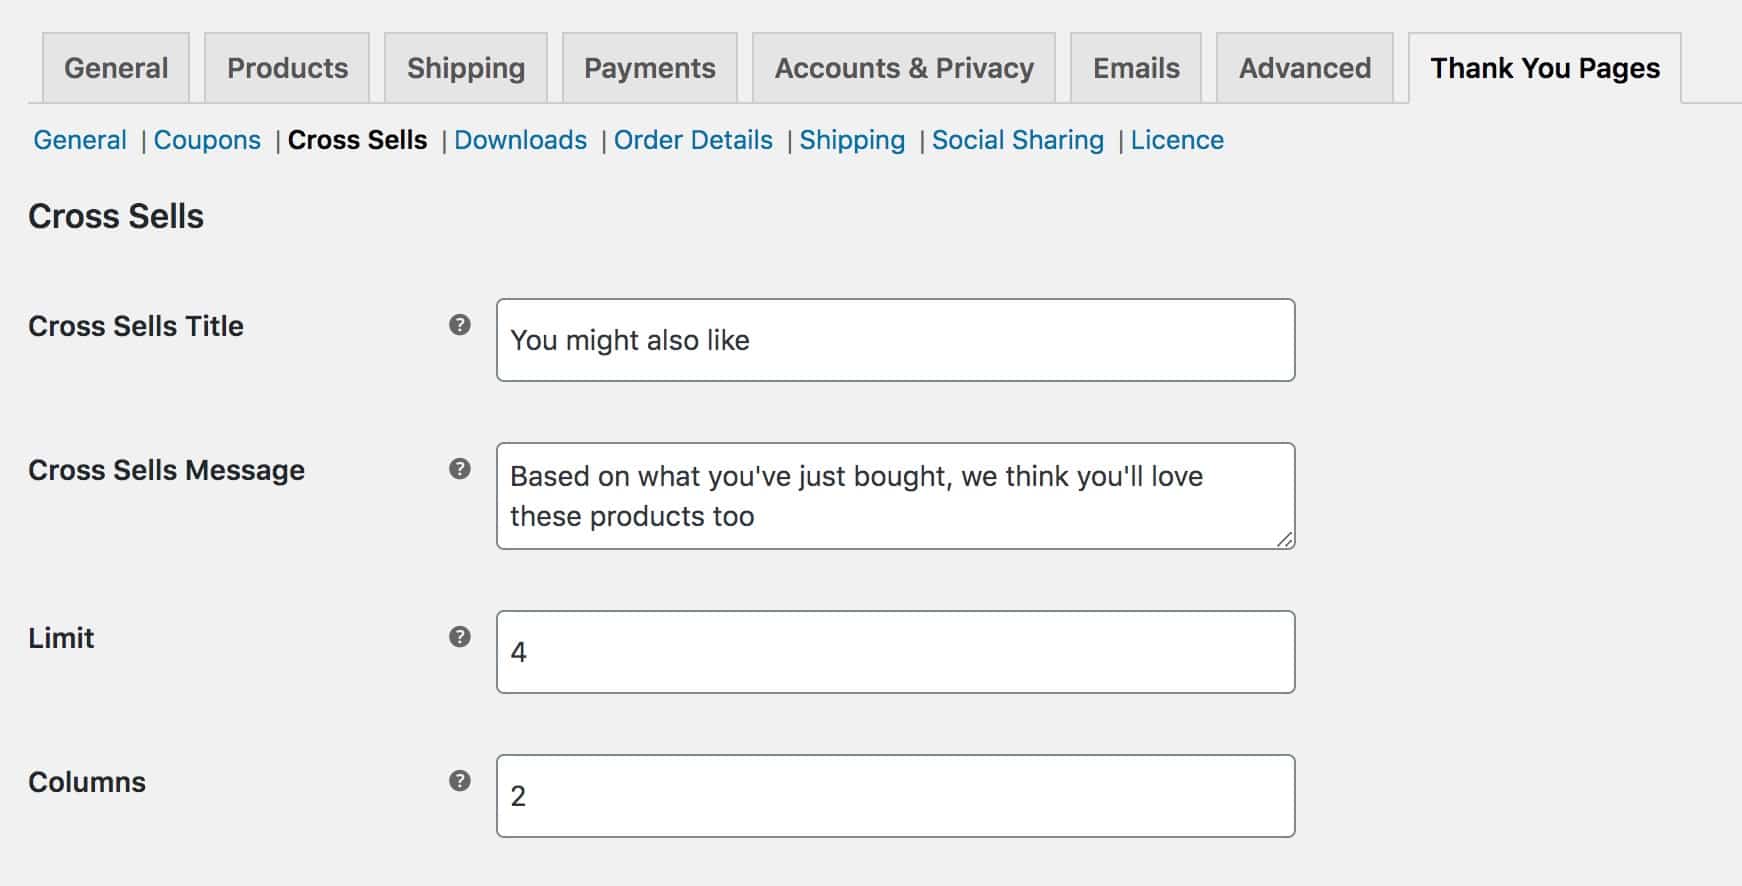
- Go to the Thank You Page in the settings and click on Cross-Sells.
- If you want, update the Title.
- Update the ‘Limit’ section to decide how many products you want to display on the Thank You Page.
- Update the ‘Columns’ section to decide on how many columns should be displayed.
Adding Downloads to the Thank You Page
Now to help the customers in downloading the information regarding the product, follow these steps-
- Edit New Thank You Page.
- Choose a Title.
- Add the Shortcode [order_download] in the area of content.
For further steps,
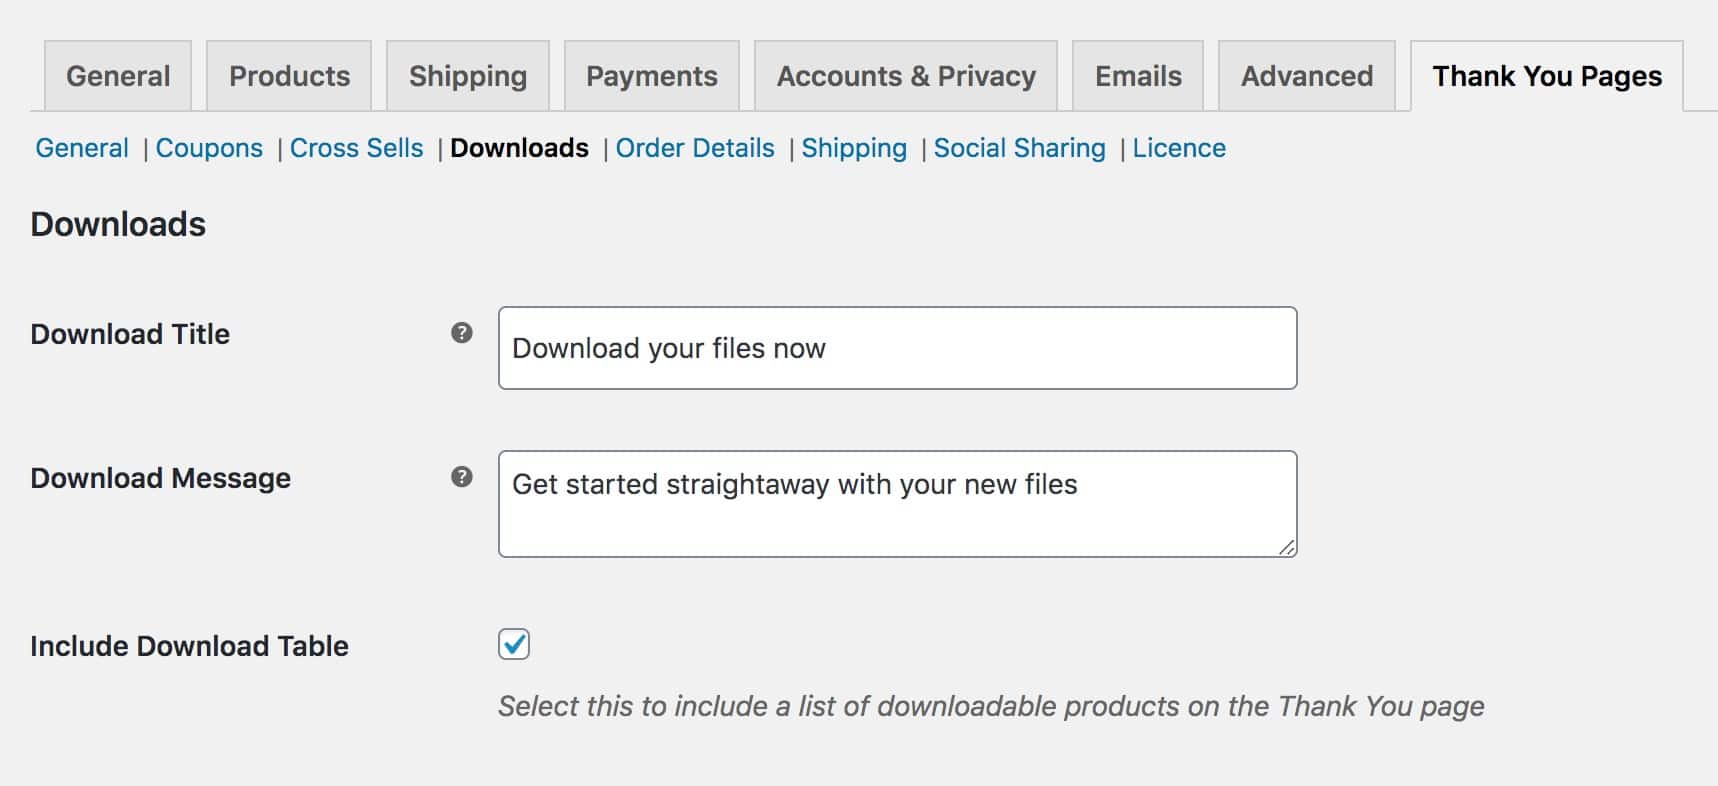
- Go to the Thank You Page in the settings and click on Downloads.
- Fill the Title and Message area.
- Right-click on the ‘Include download Table’, and that’s it.
Adding a Shipping Map to the Thank You Page
To enhance the user’s online shopping experience, you can add a shipping map using the below steps.
- Edit New Thank You Page.
- Choose a name.
- Add the Shortcode [order_shipping] in the area of content.
For further steps,
- Go to the Thank You Page in the settings and click on Shipping.
- Give a message and Title.
- Right-click on ‘Add Map’ empty block.
- In the ‘Google API key’ section, enter your Google API key, click save, and you’re done.
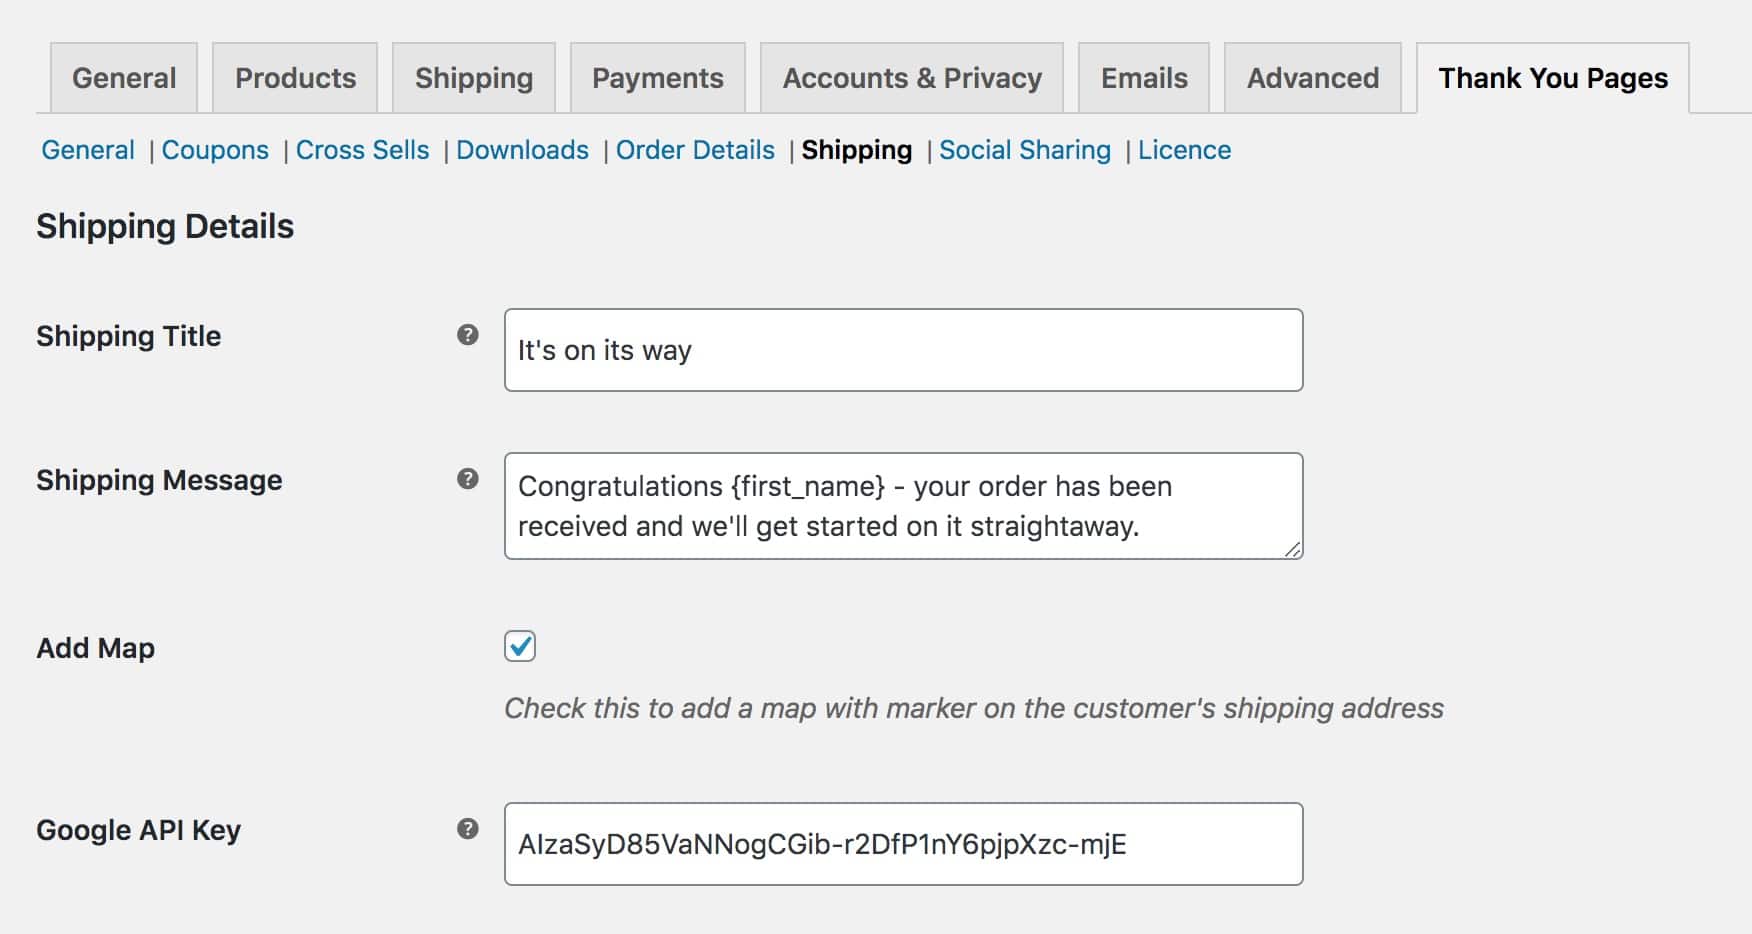
If you don’t know how to get your Google API Key, don’t worry! Just log into Google Maps, and you’ll find your API key.
Adding a Social Share Button to the Thank You Page
The most important step that you can’t skip is the social share button. For including it in your thank you page, follow the steps stated below.
- Edit New Thank You Page.
- Choose a name.
- Add the Shortcode [order_Social_Shares] in the area of content.
For further steps,
- Go to the Thank You Page in the settings and click on Social Shares.
- Give a message and Title.
- Right-click on ‘Enable Tweet Button’ if you want that customers share their experience through Twitter.
- Right-click on ‘Enable Facebook Button’ if you want that customers share their experience through Facebook.

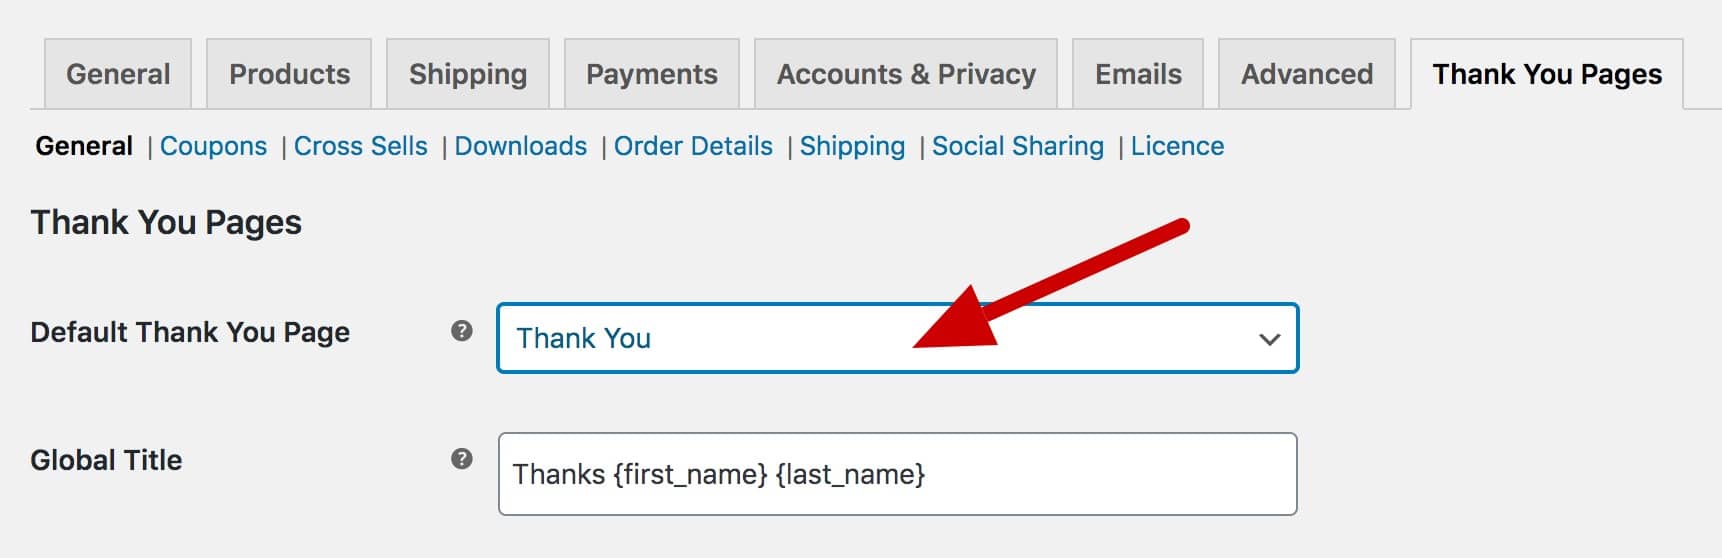
Replace Default Thank You Page in WooCommerce
After creating your custom Thank You page, last step is to replace it with the current default page on WooCommerce. Here are the steps to replace it.
- Open WooCommerce Settings.
- Navigate to Thank You Pages -> General.
- Choose the newly created page in the “Default Thank You Page” field.
- Now your Thank You Page is replaced with the customized page.
Conclusion
So, this is how you can create a professional-looking WooCommerce Thank You Page. Isn’t it easy and straightforward! A customized thank you page will surely help you to increase your sales.
If you have missed any information, feel free to have a look at the above points. All these points are valuable and help you to increase your online sales. Having a perfect thank you page is a must for online stores.